October 13, 2016
Regular expression to remove blank lines
If you are using Notepad++, replace ^[\n\r]+ with nothing in the replace
Regular expression to remove html
Regular expression : ^<.*>
Replace ^<.*> with blank if we use Notepad++
Example:
<option value="/html/A.htm">A
<option value="/html/B.com">B
<option value="/html/C.htm">C
The replace will produce:
A
B
C
Replace ^<.*> with blank if we use Notepad++
Example:
<option value="/html/A.htm">A
<option value="/html/B.com">B
<option value="/html/C.htm">C
The replace will produce:
A
B
C
September 23, 2016
Teradata sql - retrieve top and bottom 50 percentage of the records
Top 50%
----------
select top 50 percent *
from table1
order by id asc
Bottom 50%
---------------
select top 50 percent *
from table1
order by id desc
----------
select top 50 percent *
from table1
order by id asc
Bottom 50%
---------------
select top 50 percent *
from table1
order by id desc
September 21, 2016
Update from select
Update table1
from
(
select
t1.x,
t1.y
from table2 t2
left join table3 t3
on t2.id = t3.id
) input
set f1 = input.x
where f2 = input.y
from
(
select
t1.x,
t1.y
from table2 t2
left join table3 t3
on t2.id = t3.id
) input
set f1 = input.x
where f2 = input.y
Insert into with select
Insert into table1
(
field1,
field2,
field3
)
select
t2.x,
t2.y,
t3.x
from table2 t2
left join table3 t3
on t2.id = t3.id
(
field1,
field2,
field3
)
select
t2.x,
t2.y,
t3.x
from table2 t2
left join table3 t3
on t2.id = t3.id
September 14, 2016
July 8, 2016
Scheduling daily backup job using crontab
1. cd /etc/cron.daily
2. Create a symbolic link to the job
ln -s /home/auser/mysqlbackups/db_to_s3_backup.sh db_backup
This will make it run at 4.02am daily per crontab definition
> cat /etc/crontab
...
.....
# run-parts
01 * * * * root run-parts /etc/cron.hourly
02 4 * * * root run-parts /etc/cron.daily
22 4 * * 0 root run-parts /etc/cron.weekly
42 4 1 * * root run-parts /etc/cron.monthly
~
...
Crontab format. Ref: https://www.pantz.org/software/cron/croninfo.html
# Minute   Hour   Day of Month       Month          Day of Week        Command
# (0-59)  (0-23)     (1-31)    (1-12 or Jan-Dec)  (0-6 or Sun-Sat)
    0        2          12             *                *            /usr/bin/find
Centos - running commands at system initialization
Did this to restart DB and Web server during system boot.
1. Create a initialization script at /root/instance_init.sh
Commands are chained using && to make sure it executes in sequence
#!/bin/bash
echo "Step: staring mysql" &&
service mysqld start &&
echo "Step: restoring database" &&
runuser -l auser -c '/home/auser/mysqlrestore/s3_to_db_restore.sh' &&
echo "Step: starting jboss" &&
runuser -l auser -c '/usr/local/jboss-6.1.0.Final/bin/startjboss.sh'
2. Open > vi /etc/rc.d/rc.local
append a line:
sh /root/instance_init.sh
Backup and Restore MySql backup to/from AWS S3
Steps followed from a Centos 6 machine:
1. yum install s3cmd
2. Created a configuration file .s3cfg under user's home directory.
Defined access and secret keys in the file.
access_key=<access key>
secret_key=<secret key>
3. Created a backup script file:
#!/bin/sh
mysqlpass="your password"
db_schema_name="your db schema"
s3bucket="s3://your bucket name"
user_home="/home/auser"
script_home="/home/auser/mysqlbackups"
backup_file="some.backup.sql.gz"
mysqldump -u root -p$mysqlpass $db_schema_name > $script_home/temp.sql
gzip $script_home/temp.sql
rm -rf $script_home/$backup_file
mv $script_home/temp.sql.gz $script_home/$backup_file
/usr/bin/s3cmd -c $user_home/.s3cfg put $script_home/$backup_file $s3bucket/$backup_file
4. Created a restore script file:
#!/bin/sh
mysqlpass="your password"
db_schema_name="your db schema"
s3bucket="s3://your bucket name"
user_home="/home/auser"
script_home="/home/auser/mysqlbackups"
backup_file="some.backup.sql"
cd $script_home
1. yum install s3cmd
2. Created a configuration file .s3cfg under user's home directory.
Defined access and secret keys in the file.
access_key=<access key>
secret_key=<secret key>
#!/bin/sh
mysqlpass="your password"
db_schema_name="your db schema"
s3bucket="s3://your bucket name"
user_home="/home/auser"
script_home="/home/auser/mysqlbackups"
backup_file="some.backup.sql.gz"
mysqldump -u root -p$mysqlpass $db_schema_name > $script_home/temp.sql
gzip $script_home/temp.sql
rm -rf $script_home/$backup_file
mv $script_home/temp.sql.gz $script_home/$backup_file
/usr/bin/s3cmd -c $user_home/.s3cfg put $script_home/$backup_file $s3bucket/$backup_file
4. Created a restore script file:
#!/bin/sh
mysqlpass="your password"
db_schema_name="your db schema"
s3bucket="s3://your bucket name"
user_home="/home/auser"
script_home="/home/auser/mysqlbackups"
backup_file="some.backup.sql"
cd $script_home
/usr/bin/s3cmd -c $user_home/.s3cfg get $s3bucket/$backup_file.gz
gzip -d $backup_file.gz
mysql -u root -p$mysqlpass $db_schema_name < $backup_file
rm -rf $backup_file
Killing JBoss process
ps -ef | grep java | awk 'NR==1{print $2}' | xargs kill -9
NR==1 gets the first process.
NR==1 gets the first process.
JBoss 6 root context
Suppose you have an application (say named example) deployed in JBoss 6.
By default your application will be accessed by <Your URL>/example.
Suppose you want to make the application available at <Your URL> i.e the root location.
Then follow the following 2 steps:
1. Change the context of the ROOT.war application
To do that, create a file named jboss-web.xml under <base folder>/jboss-6.1.0.Final/server/default/deploy/ROOT.war/WEB-INF.
<?xml version="1.0"?>
<!DOCTYPE jboss-web PUBLIC "-//JBoss//DTD Web Application 5.0//EN"
"http://www.jboss.org/j2ee/dtd/jboss-web_5_0.dtd">
<jboss-web>
<context-root>root</context-root>
</jboss-web>
2. Add a jboss-web.xml under WEB-INF of your application
<?xml version="1.0"?>
<!DOCTYPE jboss-web PUBLIC "-//JBoss//DTD Web Application 5.0//EN"
"http://www.jboss.org/j2ee/dtd/jboss-web_5_0.dtd">
<jboss-web>
<context-root>/</context-root>
</jboss-web>
Now running <Your URL> in a browser will point to your example application.
July 6, 2016
AWS instance - how to find meta data of an EC2 instance
Login to the instance and:
> curl http://169.254.169.254/latest/meta-data/
ami-id
ami-launch-index
ami-manifest-path
block-device-mapping/
hostname
instance-action
instance-id
instance-type
kernel-id
local-hostname
local-ipv4
mac
metrics/
network/
placement/
profile
public-hostname
public-ipv4
public-keys/
ramdisk-id
reservation-id
security-groups
services/
Example:
> curl http://169.254.169.254/latest/meta-data/ami-id
June 30, 2016
SQL substring
select substr(file_date, 1, 10) from files_tb
Input: 2014-03-16-12-00-00
Output: 2014-03-16
Input: 2014-03-16-12-00-00
Output: 2014-03-16
Bitbucket, Git and Eclipse
I had a project which wasn't version controlled. So I decided to use BitBucket for that. The steps are documented here:
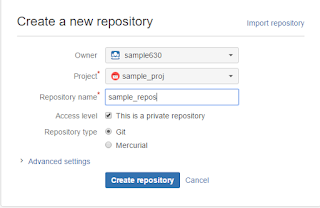
1. Created an account in Bitbucket https://bitbucket.org/
2. Created a team, project and repository in Bitbucket. Used Git as the repository type.
3. Next cloned the repository locally. I'm using Eclipse, so opened the Git repository perspective and clicked on Clone a Git repository

4. Follow the wizard. The repository URI is found in Clone section of the repository


5. Finally you'll be able to see the local clone in the file system or in Eclipse Git repository browser


6. Next right click your project in Eclipse Project Explorer/Navigator. Then Team>Share Project and follow the wizard. A new "master" branch get automatically created.


 7. Next right click project. Team>Commit and follow the wizard. At the end, check the Repository Explorer


8. Edit/add a file and do local commit. Right click. Team>Commit


See the different version identifier of local and remote.
9. Now push to remote and verify again. Right click. Team>Push to Upstream. Both local and remote versions will become the same.

10. Verify the commits in Bitbucket
 11. Create Developer branch
Right click the Local master and Create Branch


12. Make some modifications in branch and Commit (don't push upstream for now)

13. Merge with Local master
First make Local master the working one by right clicking and Checkout

Next goto Project Explorer and make sure the Local master is selected. Then


14. Next individually Push to upstream both master and developer branches.
For master,

For developer, first checkout. Then Goto Project explorer. Right click. Team>Push to upstream
15. Finally

1. Created an account in Bitbucket https://bitbucket.org/
2. Created a team, project and repository in Bitbucket. Used Git as the repository type.

3. Next cloned the repository locally. I'm using Eclipse, so opened the Git repository perspective and clicked on Clone a Git repository

4. Follow the wizard. The repository URI is found in Clone section of the repository


5. Finally you'll be able to see the local clone in the file system or in Eclipse Git repository browser

6. Next right click your project in Eclipse Project Explorer/Navigator. Then Team>Share Project and follow the wizard. A new "master" branch get automatically created.


8. Edit/add a file and do local commit. Right click. Team>Commit


See the different version identifier of local and remote.
9. Now push to remote and verify again. Right click. Team>Push to Upstream. Both local and remote versions will become the same.

10. Verify the commits in Bitbucket

Right click the Local master and Create Branch


12. Make some modifications in branch and Commit (don't push upstream for now)

13. Merge with Local master
First make Local master the working one by right clicking and Checkout
Next goto Project Explorer and make sure the Local master is selected. Then


14. Next individually Push to upstream both master and developer branches.
For master,
For developer, first checkout. Then Goto Project explorer. Right click. Team>Push to upstream
15. Finally

May 13, 2016
Weekday from date
select
a_timestamp, cast(cast(a_timestamp as format 'E4') as char (9)) WeekDay, count(*)
from table
group by 1,2
a_timestamp, cast(cast(a_timestamp as format 'E4') as char (9)) WeekDay, count(*)
from table
group by 1,2
Subscribe to:
Comments (Atom)